IntroductionThis article shows one way to combine ACE and ATL. It is not intended as a feature demonstration, but as a small "starter" solution that shows a workable recipe for achieving this.
I assume that this article will mostly be of interest to developers that are familiar with ACE, hence the somewhat verbose description on how to set up the ATL part of the project.
ACE provides a wealth of functionality when it comes to multi-threading and synchronization. It has one of the most feature-complete APIs for developing fast and reliable networked solutions in C++. The framework provides state of the art functionality for writing serious real-time software solutions.
In this article, we will build a simple COM Service application demonstrating one possible approach to integrating ACE and ATL. ACE will be used to implement asynchronous callbacks from the service to the COM clients.
ACE is a C++ library with an excellent track record when it comes to developing reliable solutions. For a list of companies and projects using ACE, take a look at Who is Using ACE.
While ACE is mostly used to develop portable and highly efficient networked solutions, integrating it with ATL is an interesting concept. The same approach can be used to enable integration with TAO, allowing us to easily develop combined Corba and COM services.
ACE is according to Douglas C. Schmidt, the inventor of ACE, written to be portable, flexible, extensible, predictable, reliable, and affordable.
Since it is an open source project, it is certainly affordable, and it has an active and responsive developer community.
As a developer, I can appreciate the “flexible, extensible, predictable, reliable” parts too.
If you don’t know anything about ACE, take a look at this tutorial.
PrerequisitesDownload ACE at http://download.dre.vanderbilt.edu and build the project according to the included instructions – or take a look athttp://www.dre.vanderbilt.edu/~schmidt/DOC_ROOT/ACE/ACE-INSTALL.html for detailed instructions.
This article assumes that "config.h" for the ACE libraries includes:
 Collapse
#define ACE_NTRACE 0before:
Collapse
#include "ace/config-win32.h"Defining "ACE_NTRACE" as 0 enables extensive output of tracing information during execution by turning on the "ACE_TRACE" macro.
Remember to set the "ACE_ROOT" environment variable and add "%ACE_ROOT%\lib" to the system path.
Under Windows 7, run Visual Studio as administrator to enable automatic registration of the COM application during builds.
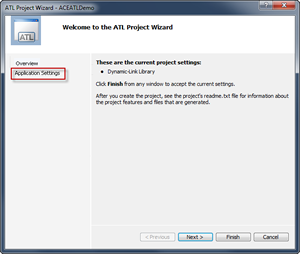
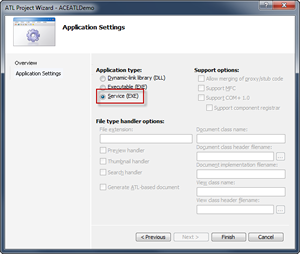
Create the ProjectWe will start by creating a standard ATL service application.

Remember to select the “Service (EXE)” radio button on the “Application Settings” page of the ATL project Wizard.
Click finish and Visual Studio creates a standard ATL service application.
Now we need to tell Visual Studio where it will find the ACE libraries.

Add "$(ACE_ROOT)\lib" to the "Library Directories"

At this point, we are ready to add our ATL COM object implementation, so switch to the "Class View" and select Add->Class from the projects popup menu.

This will bring up the "Add Class" dialog where we will select "ATL Simple Object".

Click "Add" to bring up the ATL Simple Object Wizard:

Enter "Demo" in the "Short name" field and go to the "Options" page:

By selecting the "Free" threading model, we tell COM that we will be able to deal with synchronization issues on our own. In this example, we do not want to support Aggregation, but we do want to provide support for error handling using "ISupportErrorInfo" and "Connection Points" to provide notifications using COM events.
At this point, we have a basic "do-nothing" COM service, and it is time to start adding functionality based on ACE, but first we need to tell Visual Studio where it will find the include files that allows us to use ACE. Bring up the properties dialog of the project and add $(ACE_ROOT) to the "Include directories".

Go to the Linker->System page and change the "SubSystem" setting to "Console (/SUBSYSTEM:CONSOLE)". Something that is often useful during debugging, and harmless in production scenarios since a service is not visible anyway.
This step also allows us to use ACE_TMAIN(int argc, ACE_TCHAR* argv[]) as our entry point.
Open "stdafx.h" and add the following includes to the end of the file:
Collapse
#include "ace/Log_Msg.h"#include "ace/Svc_Handler.h"#include "ace/Method_Request.h"#include "ace/Activation_Queue.h"#include "ace/Future.h"#include <vector>Open ACEATLDemo.cpp and add the following after the include section to tell the linker about the ACE library:
Collapse
#ifndef _DEBUG#pragma comment(lib,"ace")#else#pragma comment(lib,"aced")#endifAt this point, our project looks something like this:

Rebuild the project and we are ready to start implementing the COM service based on functionality from ACE.
To make things interesting, we will implement the core of our service as an active object, where the functionality is executed asynchronously on a separate thread. The class looks like this:
Collapse
class CDemo;class CDemoImpl : public ACE_Task_Base{ ACE_Activation_Queue activation_queue_; std::vector<CDemo*> clients_;public: CDemoImpl(void); ~CDemoImpl(void); virtual int svc (void); int enqueue (ACE_Method_Request *request); int exitImpl(); int postMessageImpl(CComBSTR text); int registerImpl(CDemo *pDemo); int unregisterImpl(CDemo *pDemo); IntFuture callExit(); void callPostMessage(BSTR bstr); IntFuture callRegister(CDemo *pDemo); IntFuture callUnregister(CDemo *pDemo);};IntFuture is a simple typedef:
Collapse
typedef ACE_Future<int> IntFuture; A future is a construct that allows us to wait on a possible future value.
ACE lets us use the following declaration to implement a singleton, which is a construct that guarantees that there will be only one instance of “CDemoImpl” accessible through “DemoImpl”.
Collapse
typedef ACE_Singleton<CDemoImpl, ACE_Null_Mutex> DemoImpl; The heart of the “CDemoImpl” class is the “svc” function:
Collapse
int CDemoImpl::svc (void){ ACE_TRACE ("CDemoImpl::svc"); HRESULT hr = CoInitializeEx(NULL, COINIT_MULTITHREADED); if (FAILED(hr)) { ACE_ERROR ((LM_ERROR, ACE_TEXT ("CoInitializeEx failed - returned:%d\n"),hr)); return -1; } while (1) { auto_ptr<ace_method_request /> request (this->activation_queue_.dequeue ()); if (request->call () == -1) { break; } } return 0;}Requests are dequeued from the activation queue and executed using their “call” function.
An “ACE_Method_Request” typically looks like this:
Collapse
class CExitMethodRequest : public ACE_Method_Request{ IntFuture result_;public: CExitMethodRequest(IntFuture& result) : result_(result) { ACE_TRACE ("CExitMethodRequest::CExitMethodRequest"); } ~CExitMethodRequest( ) { ACE_TRACE ("CExitMethodRequest::~CExitMethodRequest"); } virtual int call (void) { ACE_TRACE ("CExitMethodRequest::call"); int result = DemoImpl::instance()->exitImpl(); result_.set(result); return result; }};The “call” function uses our “DemoImpl” singleton definition and sets the value of the “IntFuture” “result_” making the result available to the calling thread through the “IntFuture”.
The counterpart of the “svc” function is the “enqueue” function:
Collapse
int CDemoImpl::enqueue (ACE_Method_Request *request){ ACE_TRACE ("CDemoImpl::enqueue"); return this->activation_queue_.enqueue (request);}The “enqueue” function is used like this:
Collapse
IntFuture CDemoImpl::callExit(){ ACE_TRACE ("CDemoImpl::callExit"); IntFuture result; CExitMethodRequest *request = new CExitMethodRequest(result); enqueue (request); return result;}Open ACEATLDemo.cpp and enter...
Collapse
typedef ATL::CAtlServiceModuleT< CACEATLDemoModule, IDS_SERVICENAME > Inherited;...at the top of the “CACEATLDemoModule” class definition. Then add the following declarations to the class:
Collapse
void RunMessageLoop() throw();void OnStop() throw();bool ParseCommandLine(LPCTSTR lpCmdLine,HRESULT* pnRetCode) throw();and implement them like this:
Collapse
void CACEATLDemoModule::RunMessageLoop() throw(){ ACE_TRACE( "RunMessageLoop" ); ACE_Reactor::instance()->run_reactor_event_loop();}void CACEATLDemoModule::OnStop() throw(){ ACE_TRACE( "OnStop" ); ACE_Reactor::instance()->end_reactor_event_loop(); IntFuture futureResult = DemoImpl::instance()->callExit(); int result = 0; futureResult.get(result); if(result != -1) { ACE_ERROR ((LM_ERROR, ACE_TEXT ("callExit failed - returned:%d\n"),result)); } DemoImpl::instance()->wait();}bool CACEATLDemoModule::ParseCommandLine(LPCTSTR lpCmdLine, HRESULT* pnRetCode) throw(){ ACE_TRACE( "ParseCommandLine" ); bool result = Inherited::ParseCommandLine(lpCmdLine,pnRetCode); return result;}By implementing RunMessageLoop, we effectively replace ATL's default implementation and use the ACE reactor as a replacement for the standard message loop. To provide for correct handling of the service control managers stop event, we need to implement the OnStop method too. Since “DemoImpl” runs the “svc” function on a separate thread, we use “callExit” to tell the “svc” that it’s time to exit the request processing loop, and call wait to ensure that the thread has completed its execution. ParseCommandLine calls the default implementation using the “Inherited”we added to the top of the “CACEATLDemoModule” class definition. It’s here to show how it’s possible to “hook” up to ATLs processing of the command line. To support simulation if the service control managers stop event, we implement an application handler routine for console control events like Ctrl+C and Ctrl+Break.
Collapse
BOOL WINAPI ConsoleCtrlHandler(DWORD dwCtrlType){ ACE_TRACE( "ConsoleCtrlHandler" ); _AtlModule.OnStop(); return TRUE;}Now we change the “_tWinMain” function to:
Collapse
int ACE_TMAIN (int argc, ACE_TCHAR * argv[] ){ ACE_TRACE("main"); int result = 0; try { STARTUPINFO startupInfo = {sizeof(STARTUPINFO),0,}; GetStartupInfo(&startupInfo); if(IsDebuggerPresent()) { SetConsoleCtrlHandler(ConsoleCtrlHandler,TRUE); HRESULT hr = _AtlModule.InitializeCom(); result = _AtlModule.Run(startupInfo.wShowWindow); _AtlModule.UninitializeCom(); _AtlModule.Term(); SetConsoleCtrlHandler(ConsoleCtrlHandler,FALSE); } else { result = _AtlModule.WinMain(startupInfo.wShowWindow); } } catch(...) { ACE_ERROR ((LM_ERROR, ACE_TEXT ("%p\n"), ACE_TEXT ("Unknown exception in main"))); } return result;}At this point, we’ve created a working application that provides us with some useful information during execution. When the application is executed under a debugger, it will always run as a console application, disregarding the “LocalService” setting in the registry. Open ACEATLDemo.idl and add:
Collapse
[id(1)] HRESULT PostMessage(BSTR messageText);to the definition of the “IDemo” interface, and then open Demo.h and add:
Collapse
STDMETHOD(PostMessage)(BSTR messageText);as a public method. Open Demo.cpp and implement the method:
Collapse
STDMETHODIMP CDemo::PostMessage(BSTR messageText){ ACE_TRACE("CDemo::PostMessage"); DemoImpl::instance()->callPostMessage(messageText); return S_OK;}The callPostMessage function enqueues a CPostMessageMethodRequest request on the activation queue.
Collapse
void CDemoImpl::callPostMessage(BSTR bstr){ ACE_TRACE ("CDemoImpl::callPostMessage"); CPostMessageMethodRequest *request = new CPostMessageMethodRequest(bstr); enqueue (request);}When the request is dequeued, its call() function will invoke:
Collapse
int CDemoImpl::postMessageImpl(CComBSTR text){ ACE_TRACE ("CDemoImpl::postMessageImpl"); for(vector<cdemo* />::iterator it = clients_.begin(); it < clients_.end(); it++) { CDemo *pDemo = (*it); pDemo->Fire_OnPostMessage(text.m_str); } return 0;}Implementing the Test ClientTo test our server, we need to develop a small test application. This is easily done using .NET and C#. We implement the client like this:
Collapse
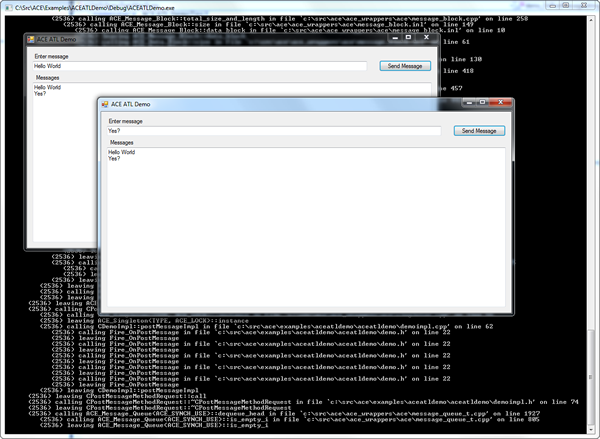
public partial class MainForm : Form{ ACEATLDemoLib.Demo demo; public MainForm() { InitializeComponent(); } protected override void OnShown(EventArgs e) { base.OnShown(e); demo = new ACEATLDemoLib.Demo(); demo.OnPostMessage += new ACEATLDemoLib._IDemoEvents_OnPostMessageEventHandler (demo_OnPostMessage); } delegate void demo_OnPostMessageDelegate(string messageText); void demo_OnPostMessage(string messageText) { if (InvokeRequired) { BeginInvoke(new demo_OnPostMessageDelegate(demo_OnPostMessage), messageText); } else { messagesTextBox.AppendText(messageText + Environment.NewLine); } } private void sendMessageButtonButton_Click(object sender, EventArgs e) { demo.PostMessage(messageTextBox.Text); }}The form looks like this in Visual Studio 2010:

Now we can start the server and a couple of instances of the client application. Since we’ve enabled the ACE_TRACE macro, the server will provide an interesting view into its behavior. Think of this project as a starting point, combining ACE or TAO with ATL allows us to create software based on the functionality provided. Browse the documentation and you will find quality implementations of some seriously challenging aspects of real-time software development.
Further ReadingThe book “The ACE Programmer's Guide: Practical Design Patterns for Network and Systems Programming” by Stephen D. Huston, James CE Johnson, and Umar Syyid provides an introduction to ACE development.
History- 2nd January, 2011 - Initial version
LicenseThis article, along with any associated source code and files, is licensed under The Code Project Open License (CPOL)

 IP卡
IP卡 狗仔卡
狗仔卡 发表于 2011-4-26 22:50:18
 提升卡
提升卡 置顶卡
置顶卡 沉默卡
沉默卡 喧嚣卡
喧嚣卡 变色卡
变色卡 显身卡
显身卡